CHAPTER 9: The OpenSpand Configuration Screen
What Is the Configuration Screen?
OpenSpand has a configuration menu that lets you change many of the ways the expansion cartridge works with your ZX81 or compatible computer.
To open the configuration screen, press the CONFIG button on the OpenSpand.
The OpenSpand will display its configuration menu on the computer screen. The keys shown at the left side of the menu are the keys you can press on the ZX81 keyboard to change the corresponding settings.
Important: You cannot return directly to a previously loaded program after entering the configuration menu. When you are finished making changes, use Q to quit the configuration menu and reset the system.
Reading the Configuration Screen
The configuration screen displays the current OpenSpand settings. Each line begins with a letter or number that identifies the setting.
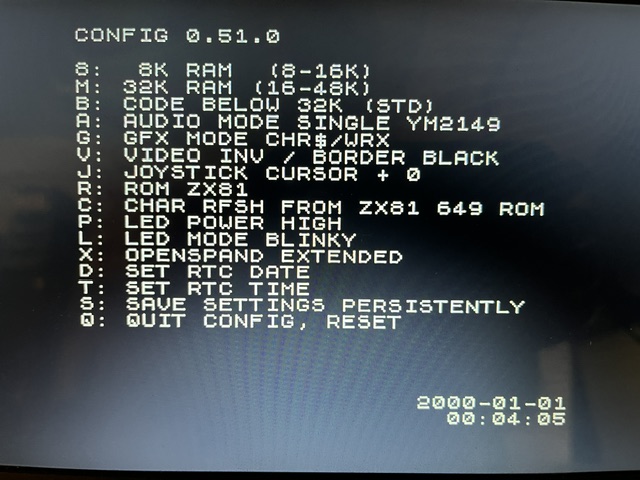
OpenSpand Version 0.51.0 Configuration Screen
Configuration Settings
| Key | Setting shown on screen | What it controls |
|---|---|---|
| 8 | 8K RAM (8–16K) | Enables the 8K RAM area from 8K to 16K. |
| M | 32K RAM (16–48K) | Selects 32K of RAM from 16K to 48K. |
| B | CODE BELOW 32K (STD) | Selects the standard code-below-32K configuration. OpenSpand also supports a code-below-48K setting for systems with an M1NOT modification. |
| A | AUDIO MODE SINGLE YM2149 | Selects the audio configuration. The configuration shown is single-chip YM2149. |
| G | GFX MODE CHR$/WRX | Selects the combined CHR$/WRX graphics mode. In this mode, 8–16K RAM is used for CHR$64/128 graphics and RAM above 16K is used for WRX graphics. |
| V | VIDEO INV / BORDER BLACK | Selects inverted video with a black border. |
| J | JOYSTICK CURSOR + 0 | Selects the joystick configuration shown on the screen. |
| R | ROM ZX81 | Selects the ZX81 ROM. OpenSpand also supports other ROM choices. |
| C | CHAR REFRESH FROM ZX81 649 ROM | Selects the character-refresh setting shown on the screen. |
| P | LED POWER HIGH | Selects the LED power level. |
| L | LED MODE BLINKY | Selects the LED operating mode. |
| X | OPENSPAND EXTENDED | Selects Extended mode rather than Compatible mode. |
| D | SET RTC DATE | Opens the setting for the real-time clock date. |
| T | SET RTC TIME | Opens the setting for the real-time clock time. OpenSpand currently uses a 24-hour time format. |
| S | SAVE SETTINGS PERSISTENTLY | Saves configuration changes so that they are retained. Configuration changes are not saved automatically. |
| Q | QUIT CONFIG, RESET | Quits the configuration menu and resets the system. |
The settings shown in the photograph are the settings currently stored in this particular OpenSpand unit. Other OpenSpand units may display different values.
Changing a Setting
To change a setting, press the corresponding key on the ZX81 keyboard.
The configuration screen is intended to make the most commonly used OpenSpand settings available without having to remember BASIC commands or configuration values.
After making changes, press S if you want those configuration changes to be saved persistently.
Extended and Compatible Modes
OpenSpand provides two operating modes: Extended and Compatible.
OpenSpand is designed to be software backwards compatible with ZXpand+. When OpenSpand changes behavior or adds a function compared with ZXpand+, these two modes allow you to choose how the interface behaves.
Extended mode provides the new OpenSpand functions and changed behavior.
Compatible mode makes OpenSpand operate as closely as possible to ZXpand+.
For a new OpenSpand user, it is useful to know which mode your cartridge is using before troubleshooting the behavior of a program.
Setting the Real-Time Clock
The configuration screen includes settings for the OpenSpand's battery-backed real-time clock.
Use:
D to set the date
T to set the time
OpenSpand currently uses a 24-hour time format.
The RTC is battery backed, so the time and date can be retained when the computer is turned off.
Saving Your Configuration
Changes made through the configuration menu are not automatically saved.
If you want your changes to remain after a reset or power cycle, enter the configuration menu and press:
S — SAVE SETTINGS PERSISTENTLY
This is particularly important when changing settings such as memory configuration, joystick type, or other configuration options.
What's Next?
The configuration screen is only the beginning. Once you understand these settings, you can explore OpenSpand's SD-card storage, additional memory, graphics modes, joystick support, sound, real-time clock, and other features.
We'll cover those features individually in the OpenSpand documentation.
User Guide
- Home
- Users Guide
- Conventions used in this guide
- CHAPTER 1: OpenSpand Compatibility
- CHAPTER 2: Connecting Your OpenSpand
- CHAPTER 3: Choosing Your Display Settings
- CHAPTER 4: Testing Your OpenSpand
- *CHAPTER 5: Storing Programs on SD Cards
- CHAPTER 6 - Removing OpenSpand from its case without damaging it.
- *CHAPTER 7: Using a Joystick
- CHAPTER 7A: OpenSpand Sound Output
- CHAPTER 8: Setting Your Real Time Clock
- Chapter 9 - The OpenSpand Configuration Screen
- Chapter 10 - Installing your Real Time Clock Battery
- * Introduction
- *CHAPTER 5A - The OpenSpand Configuaration Screen
- !! Chapter titles preceded by an asterisk * have not been written yet !!
- INDEX TO DEMO SOFTWARE ROUTINES
- FAQs
- CONTACT